HyperTech
In-line Speedometer Module
Programming Instructions
Programming Instructions
Step 1
Run the Configuration Software for the Hypertech In-line Speedometer Module. The program can be run directly from the CD-ROM, or the CD-ROM contents can be copied to the computer and run from there. The program is named SpeedoConfiguration.exe.
Step 2
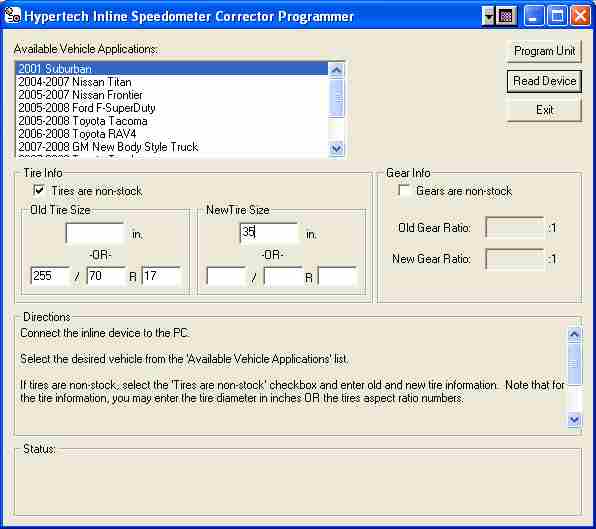
Select the vehicle application for your vehicle, highlight the correct year and make.
Step 3
If you have non-stock tires, click on the checkbox for "Tires are non-stock" and this will allow you to use the tire correction boxes. Enter the old and new tire sizes. You can enter the tire sizes in either inches or in xxx/yyyRzzz format. The ratio of the old and new tire diameters is given in the Ratio edit box below the tire sizes. The example above shows where the old (stock) tire size is entered as 255/70/R17.
If you have changed the gear ratio, click the box in front of "Gears are non-stock". Then enter the information for the old and new gear. The overall ratio will show the final correction taking into account both tire and gear.
Step 4
Connect the unit to the PC using a USB cable. If the USB drivers have not yet been installed, you will have an opportunity to do so now. USB drivers for the device are on the CD-ROM. You may have to wait 4-5 seconds for the PC to recognize the unit.
Step 5
Click on the Program button. The Status field at the bottom will indicate the status of the programming session. It should take only 4-5 seconds to program the unit. Upon completion, the Status field will say either Success or Error. If the status is Success, you are done and can disconnect the unit from the PC and install it in the vehicle. If the status was Error, the programming session was unsuccessful, and you can either attempt to program again (without disconnecting the unit from the PC), or you can contact Hypertech for support.